This lesson focuses on simple machines and how they can be found in many everyday items. Students explore the different types of simple machines, how they work, and how they are integrated into many items. Students explore common kitchen machines and identify how many simple machine types are incorporated into each item.
Age Levels: 8-11
Required Materials
Design Challenge
You are part of a team of engineers who have been given the challenge of determining whether a group of items are simple machines and what simple machines they are. Then, you will examine different can opener designs and document why you think the team of engineers designed them to work the way they do.
Extension Idea
Allow students to explore a variety of simple kitchen machines in the classroom. This will depend on the age of your students. If you use actual kitchen machines, use caution with sharp parts with young children.
The lesson can be done in as little as 1 class period for older students. However, to help students from feeling rushed and to ensure student success (especially for younger students), split the lesson into two periods giving students more time to brainstorm, test ideas and finalize their design. Conduct the testing and debrief in the next class period.
What are Simple Machines?
A simple machine is any device that only requires the application of a single force to work. Work is done when a force is applied and results in movement over a set distance. The work done is the product of the force and the distance. The amount of work required to achieve a set objective is constant, however the force required can be reduced provided the lesser force is applied over a longer distance. Increasing the distance reduces the force. The ratio between the two is the mechanical advantage. The traditional list of simple machines is: inclined plane, wheel and axle, lever, pulley, wedge, and the screw.
BRING IN TABLE FROM STUDENT WORKSHEET HERE
Some machines contain multiple simple machines. A can opener contains four simple machines…a screw, a lever, a wedge, and a wheel and axle. The wedge is found on the cutter, the lever is the handle, and the screw is the device that holds the can-opener together. The wheel and axle attach the cutter to the opener. They all work together to make opening a can much easier!
Recommended Reading
Writing Activity
Write an essay or a paragraph describing three simple machines you can find in an office or classroom.
Note: Lesson plans in this series are aligned to one or more of the following sets of standards:
CONTENT STANDARD B: Physical Science
As a result of their activities, all students should develop an understanding of
CONTENT STANDARD E: Science and Technology
As a result of activities, all students should develop
CONTENT STANDARD G: History and Nature of Science
As a result of activities, all students should develop understanding of
CONTENT STANDARD B: Physical Science
As a result of their activities, all students should develop an understanding of
CONTENT STANDARD G: History and Nature of Science
As a result of activities, all students should develop understanding of
Matter and its Interactions
Motion and Stability: Forces and Interactions
Students who demonstrate understanding can:
Engineering Design
Students who demonstrate understanding can:
Technology and Society
There are many different types of engineering fields that involve designing products and processes. Here are just some of the related engineering fields.
Environmental Engineering
Work is the product of the force exerted on an object and the object’s displacement due to that force. The formula to describe this is:
Work = Force x distance
Work is measured in joules, j (after James Prescott Joule).
Force is measured in newtons, N (after Sir Isaac Newton). Distance is measured in meters, m.
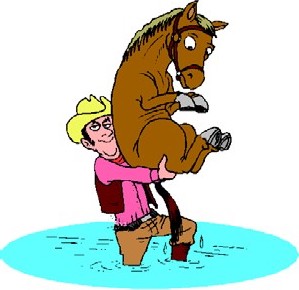
In this equation, however, the force only counts if it is in the direction that the object is moving. As an example, consider if you lifted a heavy horse and carried the horse across a river. When you have crossed the river, the only work you have
done was lifting the horse. Crossing the river while holding the horse added nothing to the amount of work you did. Keep in mind that applying force to an object doesn’t always equal work being done. If you sit on your bicycle, you apply force on the seat, but no work is being done because your force on the seat is not causing displacement. But, if you applied force to the chair by lifting it up off the floor, they your force produces displacement in the direction of motion – and work has been done.
The distance an object moves is another factor to be considered when calculating work. For a ball (for example) to move a distance from its original position, requires work to be done on the ball. And, distance is directional. This means that if you move an object in a positive direction, you have done positive work. If you move it in a negative direction, you have done negative work.
Student Question A:
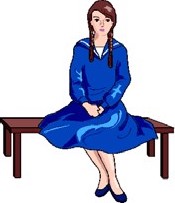
A 45kg girl sits on an 8 kg bench. How much work is done on the bench?
Remember that work = force x distance.
What is the distance? What is the work?

Student Question b:
A 40kg boy lifts a 30kg dragon 2 meters above the ground. How much work did the boy do on the dragon? Remember that work = force x distance.
What is the distance? What is the work? What do we need to include?
Simple machines are “simple” because most have only one moving part. When you put simple machines together, you get a complex machine, like a lawn mower, a car, even an electric nose hair trimmer! Remember, a machine is any device that makes work easier. In science, “work” means making something move. It’s important to know that when you use a simple machine, you’re actually doing the same amount of work — it just seems easier. A simple machine reduces the amount of force needed to move something, but what must you increase to keep the work the same?
What does “work” mean?
Simple machines all require human energy in order to function. “Work” has a special meaning in science. “Work” is only done when something is moved. For example, when you push on a wall, you actually are not doing work, because you cannot move it. Work consists of two parts. One is the amount of force (push or pull) needed to do the work. The other is the distance over which the force is applied. The formula for work is:
Work = Force X Distance
Force is the pull or the push on an object, resulting in its movement. Distance
(Displacement) is the space the object moves. Thus, the work done is the force exerted multiplied by the distance moved.
When we say a machine makes it easier for us to do work, we mean that it requires less force to accomplish the same amount of work. Apart from allowing us to increase the distance over which we apply the smaller force, machines may also allow us to change the direction of an applied force. Machines do not reduce the amount of work for us, but they can make it easier. How?
There are four types of simple machines which form the basis for all mechanical machines:

Lever
Try pulling a really stubborn weed out of the ground. Using just your bare hands, it might be difficult or even painful. With a tool, like a hand shovel, however, you should win the battle. Any tool that pries something loose is a lever. A lever is an arm that “pivots” (or turns) against a “fulcrum” (or point). Think of the claw end of a hammer that you use to pry nails loose. It’s a lever. It’s a curved arm that rests against a point on a surface. As you rotate the curved arm, it pries the nail loose from the surface. And that’s hard work! There are three kinds of levers:

Inclined Plane
A plane is a flat surface. For example, a smooth board is a plane. Now, if the plane is lying flat on the ground, it isn’t likely to help you do work. However, when that plane is inclined, or slanted, it can help you move objects across distances. And, that’s work! A common inclined plane is a ramp. Lifting a heavy box onto a loading dock is much easier if you slide the box up a ramp–a simple machine.
Wedge
Instead of using the smooth side of the inclined plane, you can also use the pointed edges to do other kinds of work. For example, you can use the edge to push things apart. Then, the inclined plane is a wedge. So, a wedge is actually a kind of inclined plane. An axeblade is a wedge. Think of the edge of the blade. It’s the edge of a smooth slanted surface. That’s a wedge!

Screw
Now, take an inclined plane and wrap it around a cylinder. Its sharp edge becomes another simple tool: the screw. Put a metal screw beside a ramp and it’s kind of hard t o see the similarities, but the screw is actually just another kind of inclined plane. How does the screw help you do work? Every turn of a metal screw helps you move a piece of metal through a wooden space.

Wheel and Axle
A wheel is a circular disk attached to a central rod, called an axle. The steering wheel of a car is a wheel and axle. The section that we place our hands on and apply force (torque) is called the wheel, which turns the smaller axle. The screwdriver is another example of the wheel and axle. Loosening a tight screw with bare hands can be impossible. The thick handle is the wheel, and the metal shaft is the axle. The larger the handle, the less force is needed to turn the screw.
Pulley
Instead of an axle, the wheel could also rotate a rope or cord. This variation of the wheel and axle is the pulley. In a pulley, a cord wraps around a wheel. As the wheel rotates, the cord moves in either direction. Now, attach a hook to the cord, and you can use the wheel’s rotation to raise and lower objects. On a flagpole, for example, a rope is attached to a pulley. On the rope, there are usually two hooks. The cord rotates around the pulley and lowers the hooks where you can attach the flag. Then, rotate the cord and the flag raises high on the pole.
Are These Machines?
Examine the drawings below and try to determine whether these are simple machines. See if you can figure out what type of simple machine it might be: class-one lever, class-two lever, third class lever, inclined plane.
 | Notes: |
 | Notes: |
 | Notes: |
 | Notes: |
 | Notes: |
Purpose:

To find out where to push on a lever to get the best lift.
Materials:
Procedure:
Questions:
What would happen if you put an object with a larger diameter than the pencil under the ruler?
Try this experiment: Move the pencil to several different locations under the ruler, then repeat the experiment. How were your results different/the same?